How to Create a Stunning Robot Figure Using 3D Model Digital Files
Creating a robot figure using digital files is an exciting and rewarding craft project that combines art, design, and technology. Whether you're a hobbyist, educator, or business owner looking to engage your audience, building a robot from a 3D model template can be both fun and informative. In this article, we’ll walk through the process of assembling a robot figure using downloadable digital files and explore why this activity is gaining popularity in today’s creative world.
Understanding 3D Models and Digital Templates
A 3D model is a virtual representation of a three-dimensional object created using specialized software. These models are used across various industries, including animation, gaming, engineering, and education. When it comes to crafting, 3D models often come in the form of printable templates that allow users to create physical objects by cutting, folding, and assembling paper-based parts.
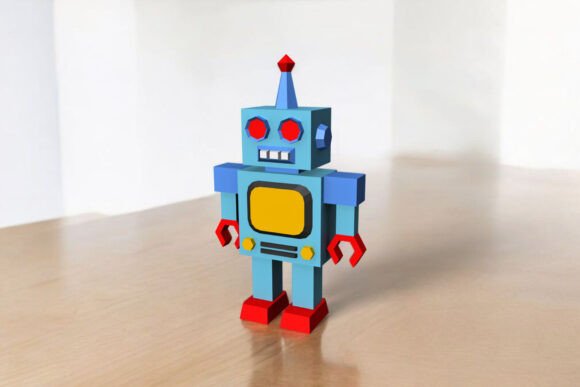
The Robot Figure – 3D Model described here is one such project designed for enthusiasts who want to bring their favorite characters to life without needing advanced technical skills. The kit includes digital files in multiple formats like PDF, DXF, EPS, PNG, and JPG, which ensures compatibility with different printing and design tools.
What You Can Expect From the Kit
- Assembling Time: Approximately 3 hours. This estimate gives you a clear idea of how long the project will take, making it suitable for weekend crafts or classroom activities.
- Assembled Size: 26 x 16 x 6 cm. The finished robot figure is compact yet detailed enough to display proudly on a shelf or desk.
- Files Included: You'll receive high-quality digital files in PDF, DXF, EPS, PNG, and JPG formats. These files contain all the necessary pieces for construction, ensuring accuracy and ease of use.
Each file type serves a specific purpose. For example, PDFs are ideal for printing instructions and templates, while DXF and EPS files can be edited in vector graphic software if needed. PNG and JPG files may be used for reference images or promotional materials if you plan to share your creation online.
Tools and Materials Required
To assemble your robot figure, you don’t need any complex machinery. Here's what you’ll require:
- Colored Printer: To print the templates at full size on A4 or letter-sized cardstock paper.
- Glue: A strong adhesive to secure the pieces together during assembly.
- Scissors: For cutting out the individual parts of the robot.
- Craft Knife: Useful for precise cuts and trimming excess material.
- Scorer or Bone Folder: Helps you make clean folds along the lines, giving your robot a professional finish.
- Non-working Ballpoint Pen: Perfect for scoring paper without tearing it, especially when working with thinner cardstock.
- Ruler: Ensures accurate measurements and straight cuts.
- A4/Letter Cardstock Paper: Provides durability and structure for the final model.
These tools are readily available and affordable, making the project accessible even for beginners. No need for expensive laser cutters or 3D printers—just a few common supplies and a bit of patience!
Step-by-Step Guide to Assembling Your Robot
Once you have all the tools and materials ready, follow these steps to build your robot:
- Print the Templates: Open the provided digital files and print them on A4 or letter-sized cardstock. Make sure to print them in actual size (full scale) for accurate assembly.
- Cut Out the Pieces: Use scissors or a craft knife to carefully cut along the outlines of each part. Take your time to ensure precision, as this affects the final look of your robot.
- Score and Fold: With a scorer or a non-working ballpoint pen, gently press along the fold lines. This helps the paper bend smoothly without cracking. Fold each piece according to the diagram included in the PDF instructions.
- Apply Glue to Flaps: Most templates include pre-designed flaps for easy assembly. Apply glue to these flaps and attach the corresponding parts together, holding them until they set.
- Final Assembly: Continue gluing and folding until all components are connected. You should end up with a fully assembled robot measuring 26 x 16 x 6 cm.
Remember, the assembling time is around 3 hours, so it's best to work in a well-lit area and take breaks if needed. Once completed, your robot becomes a beautiful decorative item or educational tool depending on your goals.
Why Choose a DIY Robot Figure?
There are several reasons why opting for a DIY robot model is a great choice:
1. Educational Value
For students and educators, building a robot from scratch provides hands-on learning about geometry, spatial reasoning, and basic engineering principles. It also introduces young learners to the concept of 3D modeling and digital fabrication in a simplified format.
2. Creativity and Customization
One of the biggest advantages of using digital templates is the ability to customize your robot. Since the files are in editable formats like DXF and EPS, you can tweak colors, add logos, or modify the design to suit your preferences before printing.
3. Cost-Effective and Eco-Friendly
Compared to traditional plastic or metal models, paper-based robots are significantly cheaper to produce. They’re also more environmentally friendly, especially if you choose recycled cardstock or reuse old paper. This makes them an excellent option for schools, small businesses, or anyone looking to reduce waste.
4. Promotes Mindfulness and Focus
In our fast-paced digital world, engaging in a hands-on craft like assembling a robot offers a refreshing break. The process requires attention to detail and careful execution, promoting mindfulness and reducing stress.
5. Great for Business and Marketing
If you run a tech-related business, a custom robot model can serve as a unique promotional item. Imagine handing out personalized robots at a trade show or using them as branded gifts. The digital files allow for easy customization with company names or logos, adding a personal touch.
Common Misconceptions About DIY 3D Models
Despite the growing popularity of DIY 3D models, some people still believe they require advanced skills or expensive equipment. Let’s clarify a few of these misconceptions:
- Misconception: You need a 3D printer. While 3D printers are fantastic for creating solid plastic models, many 3D figures can be made manually using paper and cardboard. The robot model discussed here is a perfect example of this approach.
- Misconception: It's too time-consuming. Although the estimated assembling time is 3 hours, most of this involves careful cutting and folding rather than complex assembly. With practice, the time can be reduced significantly.
- Misconception: Only for kids. While children enjoy building robots, this project is equally appealing to adults. It's a great way to bond with family members, showcase creativity, or even start a new hobby.
Practical Applications in Modern Life
DIY robot models like this one are not just fun—they have practical relevance in modern contexts:
Technology Education
Schools and coding bootcamps often use physical models to teach robotics concepts. Even though this isn't a functional robot, it helps students visualize how mechanical components fit together and understand the basics of design and structure.
Art and Design ProjectsDesigners and artists frequently incorporate 3D-printed or papercraft elements into their work. A robot model could be part of a larger installation, used in stop-motion animations, or displayed as a standalone sculpture.
Marketing and Branding
Brands in the tech industry or STEM fields often use these types of kits as giveaways or interactive displays at events. A custom-branded robot can serve as a conversation starter and help reinforce brand identity in a memorable way.
Home Decor and Gifts
Handmade robots can be a charming addition to home decor. They also make thoughtful, personalized gifts for birthdays, holidays, or as a token of appreciation. With the right finishing touches, they can resemble miniature sculptures.
Tips for Success
To ensure your robot looks its best and is assembled correctly, consider the following tips:
- Always double-check that your printed templates are scaled accurately. Many printers have options to adjust scaling settings; verify that “actual size” is selected.
- Use a ruler to guide your cuts and folds for a neat appearance.
- Label each piece before cutting to avoid confusion later.
- Work on a flat surface to keep your pieces aligned properly.
- Store unused parts in a safe place to prevent bending or damage.
If you run into any issues during the process, remember that the creators of the digital kit are usually happy to help. If you have any questions, please feel free to ask anytime. Engaging with the community or customer support can enhance your experience and provide valuable insights.
Exploring Other Uses for 3D Model Kits
While the robot model is a popular choice, there are countless other applications for 3D model kits. You could build:
- Miniature buildings for dioramas or architectural projects
- Animals or fantasy creatures for art displays
- Historical models for educational exhibits
- Custom gadgets or props for cosplay or film sets
With access to digital files in multiple formats, the possibilities are nearly endless. You can adapt these models for different purposes simply by changing the design elements or using them as inspiration for new creations.
Conclusion
Creating a robot figure using a 3D model and digital files is an enjoyable, educational, and versatile activity. By following simple steps and using commonly available tools, you can turn flat paper into a three-dimensional masterpiece in just a few hours. This project is perfect for individuals of all ages and skill levels, offering a blend of creativity, technology, and hands-on learning.
Whether you're interested in teaching others, expressing your artistic side, or exploring new marketing strategies, a DIY robot model can serve as a powerful tool. Embrace the joy of crafting and the satisfaction of seeing your design come to life. And if you ever get stuck or need assistance, remember—you can always reach out for guidance. Happy building!